Showing posts with label Mr Bones. Show all posts

Sunday, August 13, 2023

Boo

I've been seeing Halloween makes for a few weeks now and thought, "come on people, it's only July!" Now we're into August and I've been sucked into the vortex ... roflol. 

Saw a card that inspired the idea for the raised portions I've done here. Wasn't sure if it would work but I like it, I think the splintered vibe adds to the creepy ambience. 

I began with stamping the webs onto two pieces of black card and embossing with white, then cut one with the diamond die and stuck some of the shapes onto the other black piece. Once attached I spritzed with various oxide inks (dye inks won't show over black, you need the pigment) and also sprayed oxides onto watercolour card to use for my skeleton. The bats were cut from black gloss card and I bent their wings to give them some movement. When they catch the light they reflect other colours and look terrific.

There are two layers to the sentiment, as usual, as this adds more depth, and the background piece is watercolour card sponged with ink then spritzed. 

Materials used - all stamps, dies and inks are Tim Holtz unless otherwise noted:
  • stamps - Unravelled 
  • card - basic black, watercolour
  • dies - Mr Bones, Toil & Trouble, Alphanumeric Theory
  • distress oxide sprays - antique linen, frayed burlap, pumice stone, lost shadow
  • other - white embossing powder, heat tool, Big Shot, MISTI, craft foam, Dimensionals, blending brush, Simply Diamonds die (Pink Fresh Studios)

Thanks for creeping by.

Cheers
Kerry

Friday, October 7, 2022

JAI #624 - Just Add a Diorama Card

This week at Just Add Ink we're challenging you to make a diorama card. Diorama cards can be as simple as a shadow box card or more complex with many layers, but whichever style you choose it should contain a scene which is viewed through an opening.

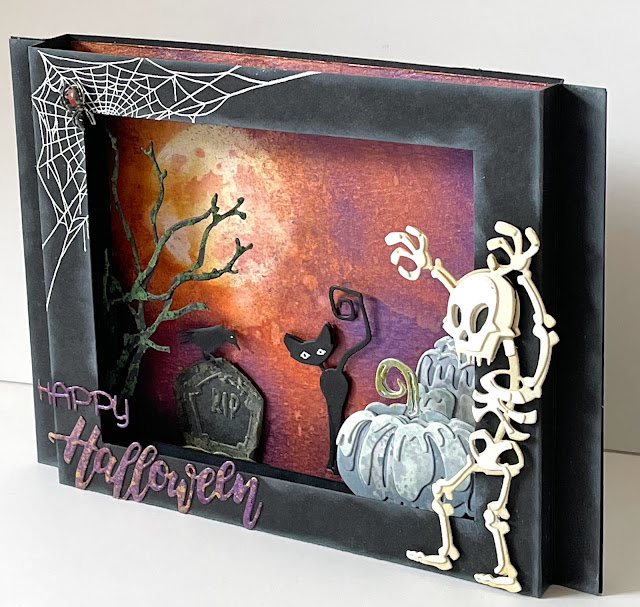
I chose a Halloween theme for my project and kept it structurally simple (just three layers) as I wanted the hard work to go into the details and not the design. And oh boy, I had so much fun making all these quirky/spooky bits and pieces!


On the middle layer I put the tree - made up of three branch die cuts - on the left side.


And on the right side of the middle layer is the front pumpkin. The back pumpkin, together with the cat, gravestone and crow, are attached to the base layer.

The 'sky' background and sentiment lettering are coloured with mica sprays so they have a wonderful sheen to them when they catch the light. I mixed some crypt grit paste with green reinker to make lichen to cover bits of the 'tree'.

And there's more crypt paste on the gravestone to give it that lovely aged and weathered look.


Bring on Halloween, I say! I'll be interested to see if I get any trick or treaters in my new neighbourhood - though, regardless, it's a great excuse to have lollies on hand! 😂😉

Materials used:

  • stamps - Unraveled (Tim Holtz)
  • card - black mixed media heavyweight, watercolour
  • Tim Holtz dies - Mr Bones, Mischevious, Pumpkin Duo, Regions Beyond
  • distress mica sprays - flickering candle, jack-o-lantern, peppermint stick, hocus pocus
  • distress oxide inks/sprays - antique linen, brushed corduroy, pumice stone, black soot, stormy sky, weathered wood, speckled egg
  • other TH products - crypt texture paste, rustic wilderness re-inker, moon mask, iced spruce and shabby shutters distress crayons, candied apple distress paint, Idea-ology adornments - Halloween, picket fence distress ink
  • other - water spritzer, heat tool, blending brushes, Dimensionals, stitched square die, white gel pen, branch die, white embossing powder, Stamparatus, Big Shot, Sidekick, paintbrush, sponge dauber, mini glue dots

Check out more diorama cards over at the JAI blog and, as always, we'd love to see your creation in our gallery this week.

Thanks for calling in.

Cheers
Kerry