Showing posts with label Christmas. Show all posts

Friday, December 5, 2025

Christmas Celebration - Just Add Ink Challenge #775

Welcome back to another Just Add Ink challenge! This time around we're challenged to...


Can I interest anyone in an Elf Cocktail or Clausmopolitan?


Looks like a great way to celebrate! I don't think I can even remember the last time I had a cocktail of any kind, though I did have a mocktail when seeing Wicked: For Good recently, which was delicious. The green elf cocktail is witchy enough to pass for Elphaba, don't you think? (It is made from a Halloween set, after all, lol)

I did some white-on-white heat embossing on my background for added interest, coloured all the bits with distress inks and just layered everything up. Tons of fun!

Materials used:
  • stamps - Christmas background (My Favorite Things), Overlapping Merry Additions (Waffle Flower)
  • dies -  Olive Martinis, Christmas Cocktails, Boos Cocktails (all Spellbinders)
  • distress inks - lumberjack plaid, aged mahogany, mowed lawn, rustic wilderness
  • other - Dimensionals, MISTI, white embossing powder, heat tool, blending brushes, clear acrylic dots, craft foam

With so many kinds of celebration, we hope you'll have the chance to create and join our challenge. There's plenty more samples to see from my team mates over on the Just Add Ink blog.

Entering in the Christmas Kickstart challenge #105 and the Paper Players challenge #766 (left vertical row of white, Christmas and die cuts).


Thanks for calling in.

Cheers
Kerry

Thursday, July 17, 2025

He Knows If You Are Sleeping...

I'm taking part in this week's Color Throwdown challenge. Here are the colours:


Now, you might not think these are Christmas in July colours (or in December, for that matter lol), but sshhhhhhhh! someone is peeking around the door frame to see if you're sleeping or awake...


This was very simple to make. Once the stencilling was done, I simply cut out the image and attached it to some grey card which had been edged with ink. The last step was stamping the sentiment over the top. 

Materials used:
  • stamps - Bold Tidings mini (Tim Holtz)
  • layering stencils - Peeking Santa (The Ton)
  • distress inks - squeezed lemonade, mustard seed, kitsch flamingo, picked raspberry
  • other inks - blush blossom, smoky slate (SU)
  • other - blending brushes, MISTI

Thanks for dropping by.

Cheers
Kerry

Thursday, December 12, 2024

Christmas Wreath - The Card Concept Challenge #212

It's time for a new challenge with The Card Concept and this month the moodboard features a stunning Christmas wreath to inspire you. 

I chose to go vintage collage for my card which incorporates both wreath and tartan from the pic. 


I added ink to the background pieces to provide cohesion as well as enhance the vintage vibe. My wreath was cut from card coloured with various inks as well as some mica, so it has a lovely sheen and glow when it catches the light. For the bow I attached plaid washi tape to card and die cut from that. The stars were thick chipboard but I removed a couple of layers as I didn't want that much bulk; the chipboard sentiment strip I left as is, as it provides a nice base for the gentleman to stand on. 

Materials used:
  • dies - Vault Collection Christmas 2021 (Tim Holtz)
  • papers - Christmas backdrops (Tim Holtz)
  • ephemera - Christmas ephemera pack, Baseboards & Transparencies Christmas 2023 (TH)
  • other - antique linen and vintage photo distress inks, sponge dauber, blending brush, Big Shot, Christmas design tape (TH), distress inks and mica stains, Dimensionals

I hope the moodboard gives you inspiration for your own cards and that you'll share them with us over on The Card Concept blog. Do check out the samples from my fellow design team members. 

This card is also being entered in the current Christmas Kickstart challenge. 

Thanks for calling in.

Cheers
Kerry

Wednesday, November 20, 2024

We Wish You Joy

I love this week's word theme at the Just Us Girls challenge and happily played along.

I'm also loving this new-to-me die set from Honey Bee Stamps. You just can't help but adore this sweet face!

I die cut all the pieces from white, vanilla or beige card and added shading with either ink or Copic markers. The antlers have two layers to give them a bit more strength, likewise the letters J and Y have three layers for dimension. The sticker initially read 'we wish you a merry Christmas' but I just cut off those first three words to use. 

Materials used:
  • dies - Lovely Layers Vintage Reindeer (Honey Bee Stamps), Large Letters (retired SU)
  • other - gold glitter card, Christmas patchwork papers (Etsy), Big Shot, Copic markers, blending brush, metallic sticker (Tim Holtz), vellum, Dimensionals, white gel pen

Thanks for stopping by.

Cheers
Kerry

Monday, September 30, 2024

Christmas Blessings - Simon Says Stamp Monday Challenge


It's my last week as Guest Designer with the Simon Says Stamp Monday Challenge. I've really enjoyed taking part and hope you've enjoyed seeing my creations each week. For this challenge we're to make a CHRISTMAS OR WINTER themed card Here in Australia Christmas happens in summer, but I love making winter-themed cards so I've incorporated both. 


This scene was a lot of fun to put together. I really wanted anyone looking at it to feel like they're there in the snow so was very generous with my gesso splatters, even extending them to the card base itself. And in case you didn't notice, the music in the background is 'White Christmas', lol. 


Do head over to the Simon Says Stamp Monday Challenge blog to see what the design team have come up with to inspire you.

The lovely folks over at Simon Says Stamp are generously giving away a fabulous $25 voucher to shop at the Simon Says Stamp Store - all you have to do is take out your crafting supplies, make something following this week's prompt, and link up at the bottom of the Challenge Blog post. You can join up to 5 times, giving you 5 chances to win! All winners are chosen randomly, so everyone has an equal chance.


Thanks for stopping by.

Cheers
Kerry

Tuesday, December 26, 2023

Bauble-licious!

Happy Boxing Day! I had a wonderful Christmas Day and Christmas Eve with family and hope you did too. Ate too much, of course, so moving very slowly today, lol. But the good news is plenty of leftover ham for sammies!

One gift I handmade this year is some decoupage ornaments - I don't have pics of the ones I gave away, but I do have pics of the one I made for myself along the same lines. 

The focal image is rice paper and I tried for a vintage/antique look to the painted background. Here's a better look at that:


I watched quite a few YouTube videos beforehand then just went for it, using rice paper and distress paints on my 'flat-sided' baubles. There's about 3 coats of varnish over everything to seal and protect. The little metal topper got some paint too, as it was silver to begin with, and I replaced the silver cord it came with with gold. It was a lot of fun and I'm really keen to make more for next year, so I'll be on the hunt for some lovely rice paper images to use. 

The 'flat-sided' baubles (I'm using inverted commas because they're not completely flat, there is still some curve) were bought on eBay - because my rice paper image was 8cm in diameter, I bought the 10cm baubles, but they do come in two smaller sizes. 

Materials used:
  • rice paper - Christmas Greetings Rounds (Stamperia)
  • baubles - eBay
  • distress paints - aged mahogany, tarnished brass
  • other - white gesso, sponge applicators, paintbrush, clear varnish, distress collage medium, Glad Wrap cling film

On the ones I gave away the images were surrounded by a border of pearls, which I aged with some antique gold wax, so there's all kinds of things you can do with these.

Thanks for calling in.

Cheers
Kerry


Tuesday, December 19, 2023

Greetings from Santa

I thought I might be finished with Christmas craft for the year but a cute little project I saw made me get out my bits and create! It's another little ornament for my grandson, made with Tim Holtz's Santa Greetings colorize dies - so adorable! I gave Santa a change of outfit colour though, lol.


You get the whole alphabet to play with in this die set, as well as numbers, so can make pretty much anything that will fit across the string. I put a plain white base on the back so I could write a message and glued some gold cord in between the layers for hanging.

Materials used:
  • card - white, black, gold foil, turquoise, grey, pink
  • dies - Santa Greetings colorize (Tim Holtz/Sizzix)
  • inks - peacock feathers distress ink
  • other - Big Shot, pink marker, tweezers, gold cord

Thanks for stopping by.

Cheers
Kerry

Friday, December 15, 2023

JAI #683 - Just Choose Two

Less than two weeks till the big day and our new Just Add Ink challenge is right up your Christmas alley! Here's our Choose Two options:

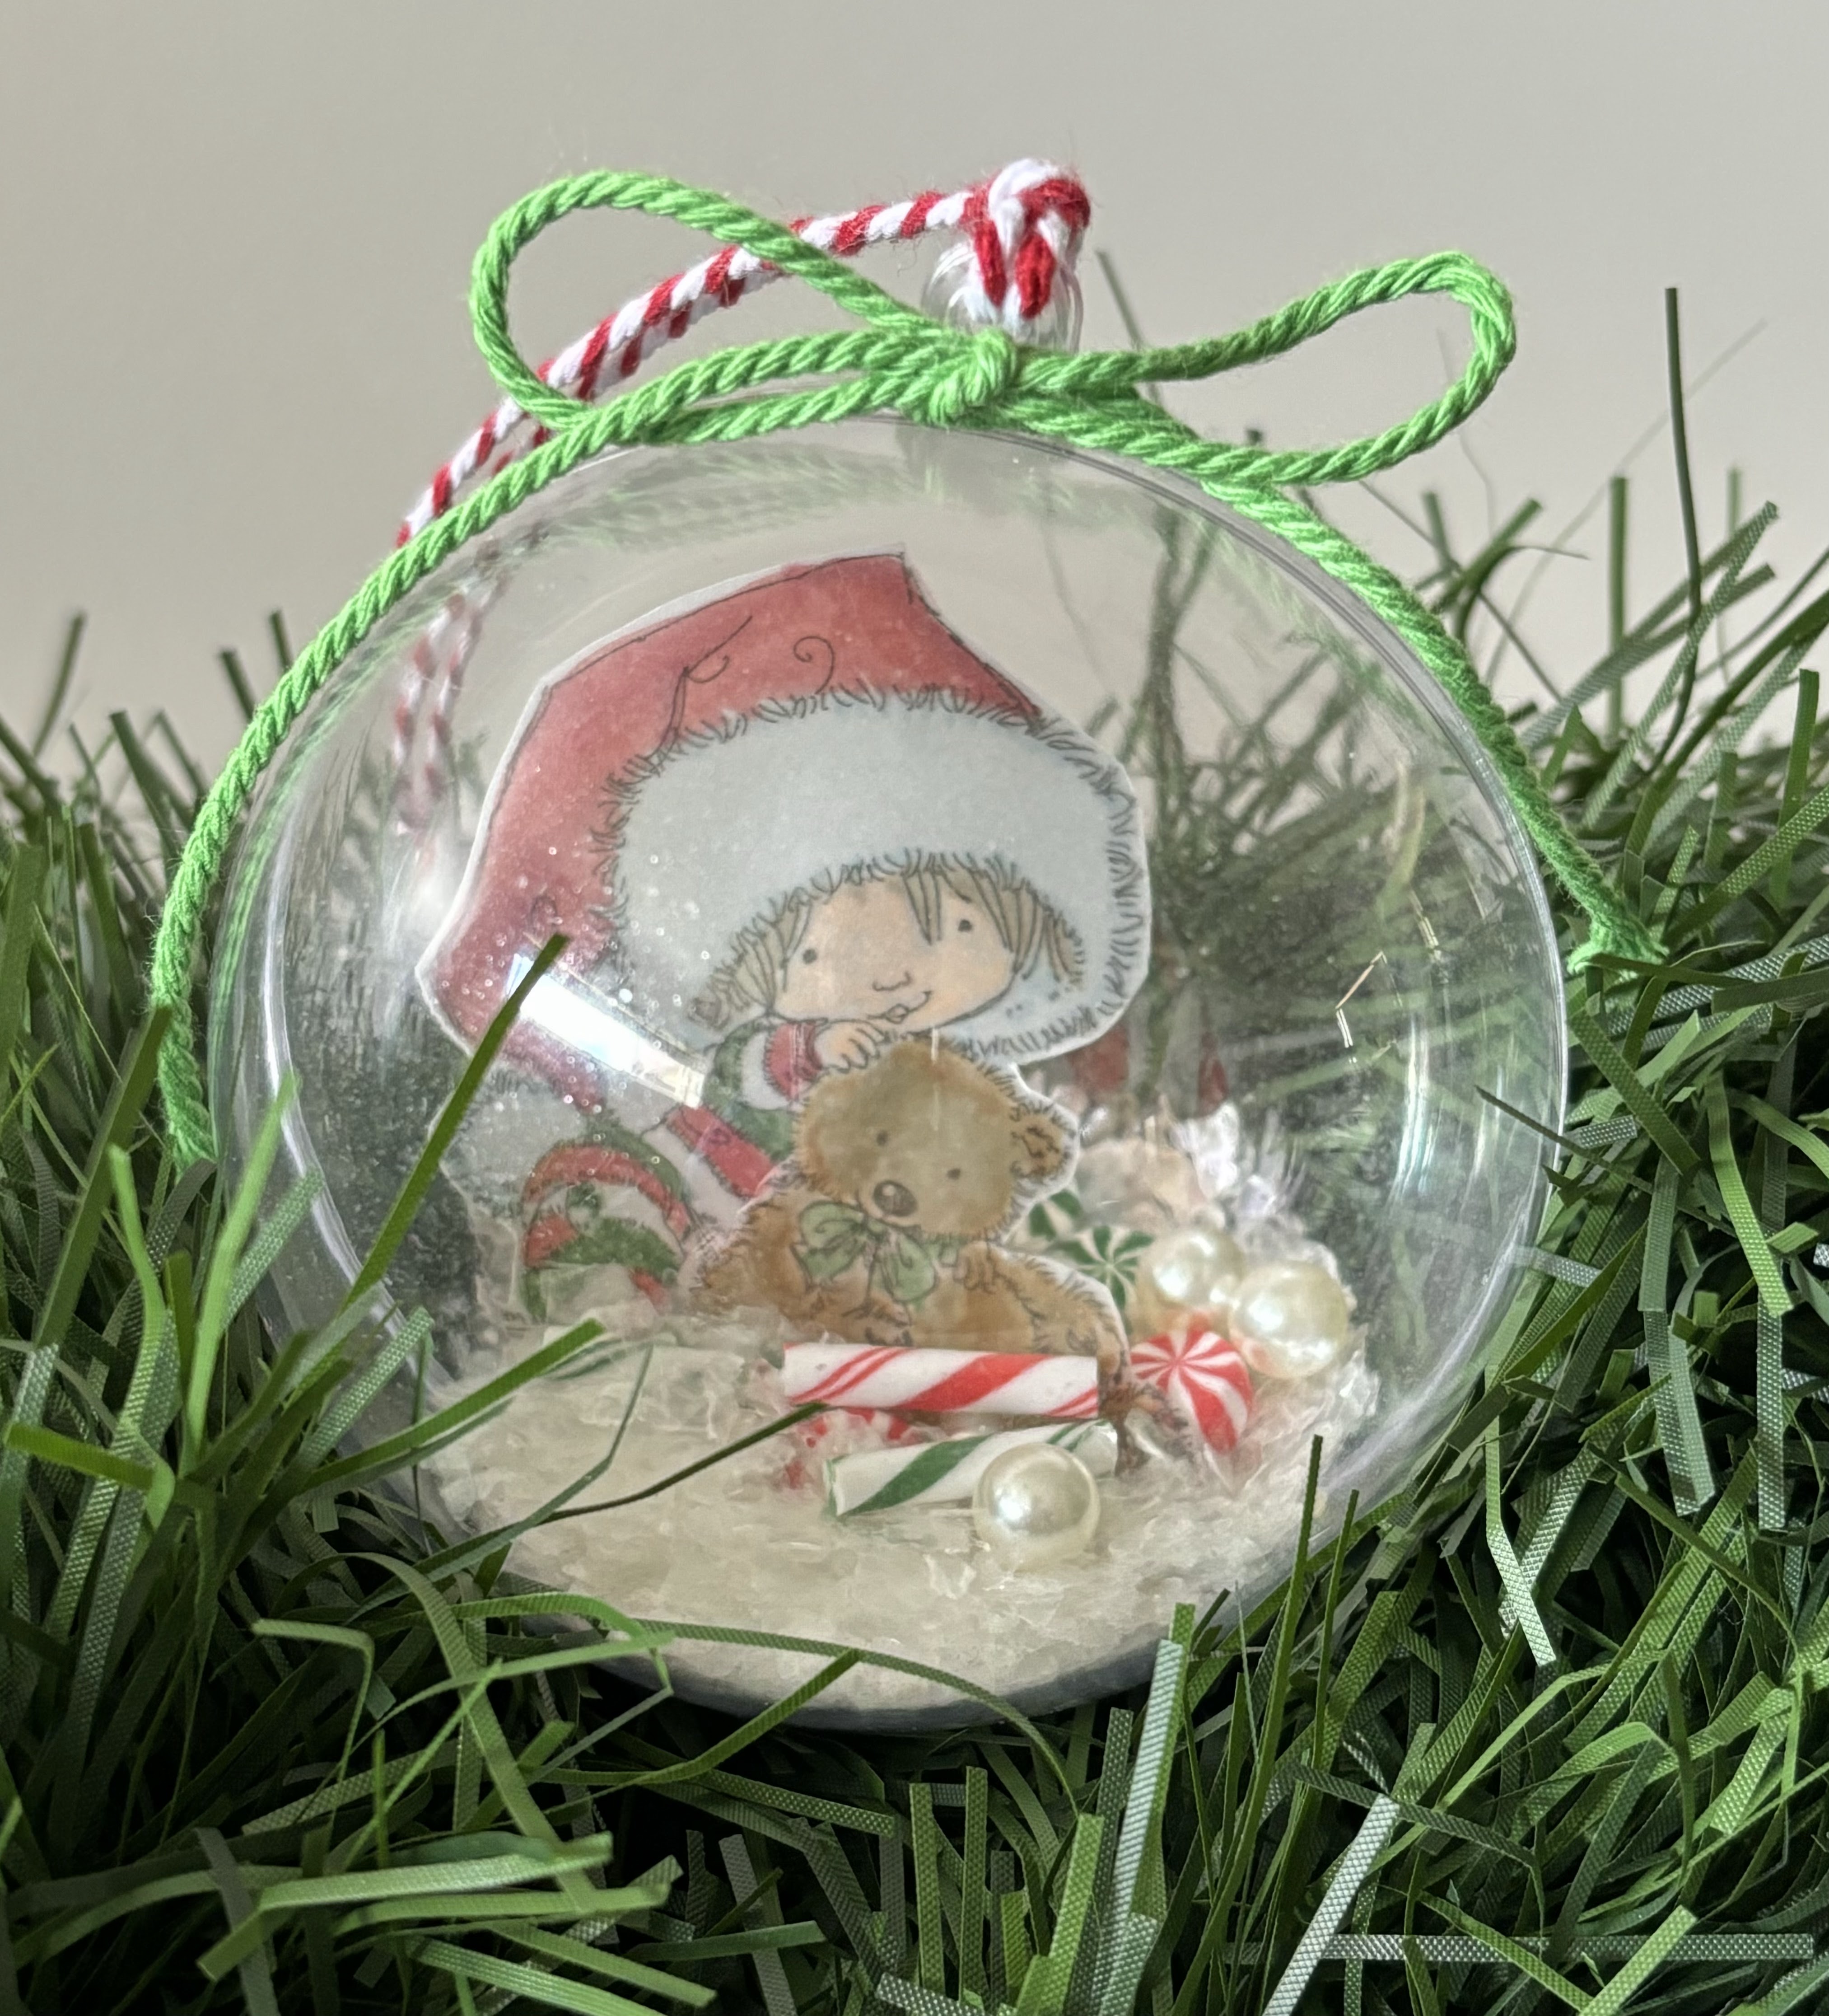
I picked ornaments and presents, choosing to make an ornament as a gift to commemorate my grandson's first Christmas:


I bought ornaments from Spotlight that come in two halves. The image was printed on vellum (so it can be seen from all sides) and coloured with markers, then fussy cut and adhered inside one half with grit paste. I added glitter, mica flakes, baubles and 'candy' confections, keeping the embellishments pretty simple because I want the stamped image to be the star of the show. 

Materials used:

  • stamps - Beary Merry Christmas (Mo Manning)
  • card - vellum
  • other - clear rock candy glitter, mica flakes, baubles, confections (all Tim Holtz), Stampin' Write markers, twines, fillable bauble (Jolly & Joy)

There're plenty more samples to inspire you over on the Just Add Ink blog so do pop over to look, and thanks for calling in.

Cheers
Kerry

Thursday, December 14, 2023

The Card Concept Challenge #202

Welcome back to another challenge with The Card Concept. This month our board is called Christmas Cheer.


 I took the Christmas theme and colours, predominantly red and white, for my clean and layered card.

My caroling elves were coloured with Copics and fussy cut. Aren't they adorable? Such sweet little faces. Oxide inks were blended for the background together with a little water splatter. As a finishing touch I added glitter to the 'fur' bits and just love the texture as well as the subtle shimmer.

Materials used:
  • stamps - Sing Joy! (by Mo Manning for Penny Black)
  • card - basic white, real red, basic black, Merry Bold & Bright DSP (Stampin' Up)
  • Copic markers - E00,11,21,33,41,50,55; G24,43,82; B0000,000; YR24,27; R24,29,39
  •  distress oxide inks - antique linen, brushed corduroy, tumbled glass
  • other - blending brushes, MISTI, water spritzer, Dimensionals, Quickie glue pen, distress glitter clear rock candy

Do check out more samples over on the Card Concept blog and remember we'd love you to create your own festive card and join us.

Thanks for stopping by.

Cheers
Kerry

Monday, December 4, 2023

Gingerbread Kisses

For Christmas decorating at home this year I've got a gingerbread and candy cane theme, so you've got to know I was compelled to create a card to match! I've kept it simple and sweet.

Materials used:

  • card - basic white, cinnamon cider, Cool Collab designer paper (My Favorite Things)
  • alcohol markers - Copic R27, R30, R46, T10; SU cinnamon cider light
  • other - gingerbread die (Hinana), Big Shot, Dimensionals, computer and printer, black marker, white gel pen

Apart from the main body of the gingerbread couple, all the other bits were die cut from white card and coloured with alcohol markers. 

Aren't they adorable? And are you craving some gingerbread as much as I am right now? Soz, my bad (lol) 😉

Cheers
Kerry

Friday, December 1, 2023

JAI #681 - Just Add Inspiration

We've a bright and cheerful image to spark your creativity this week at Just Add Ink.


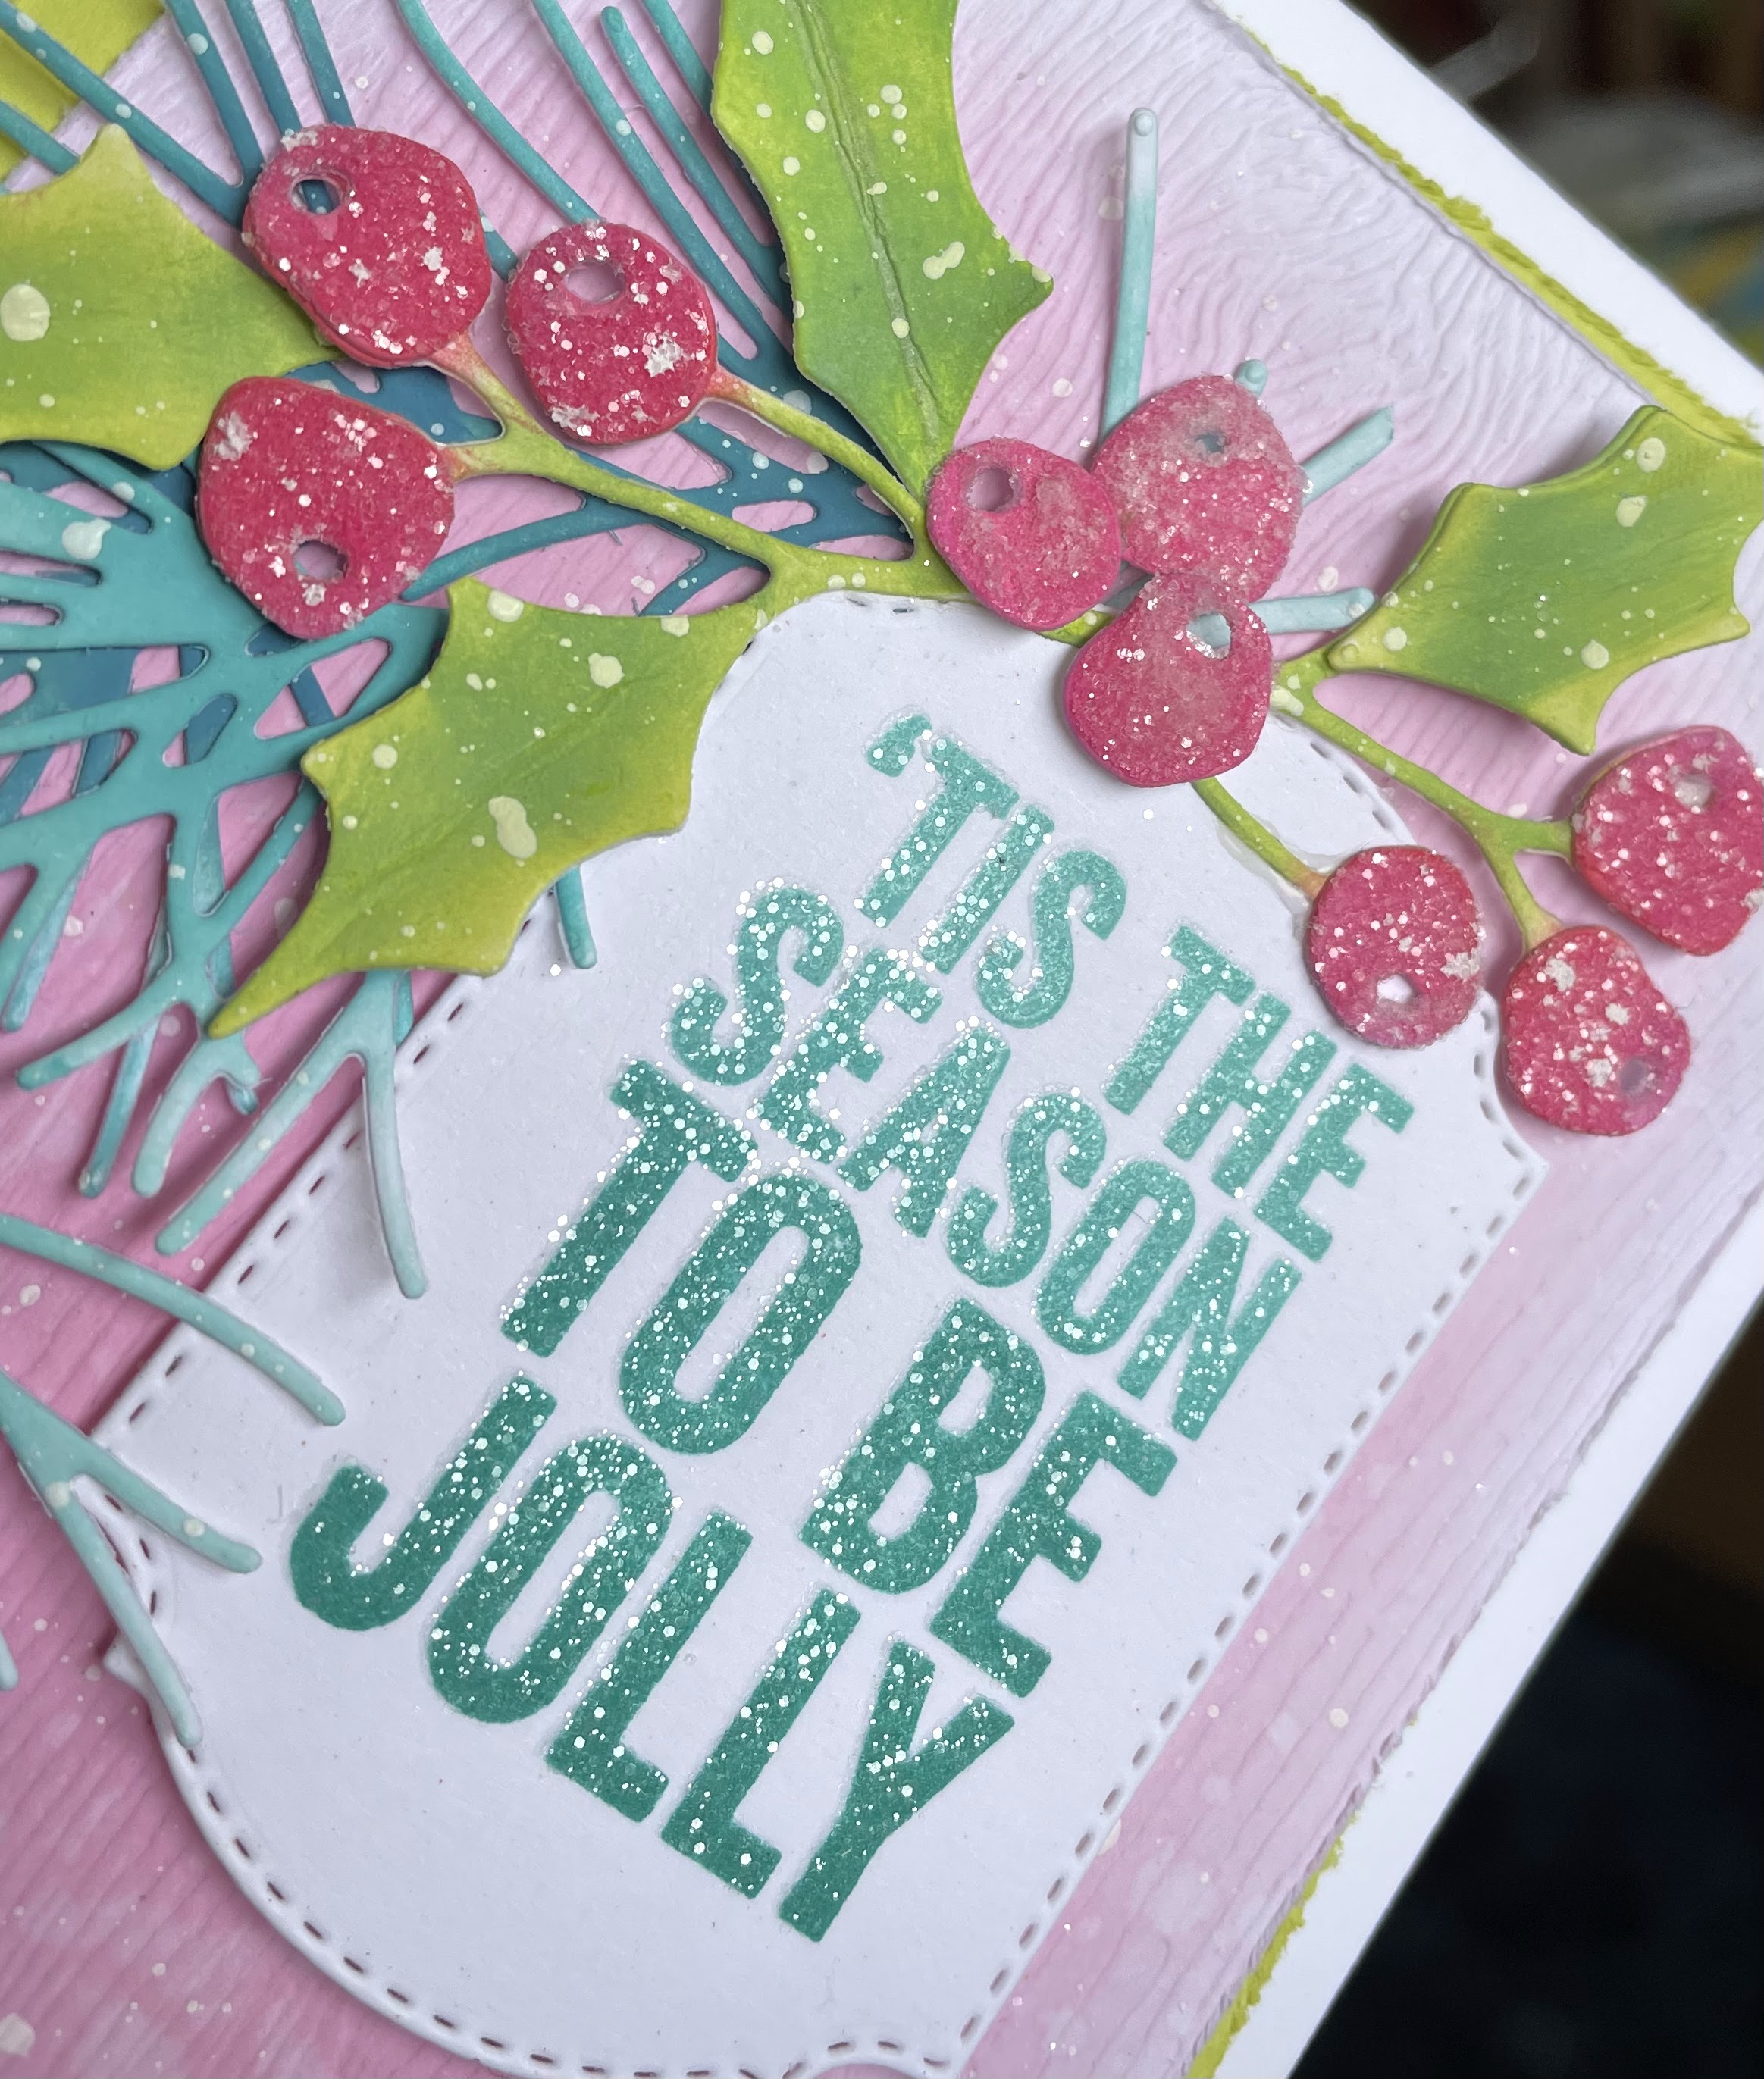
I've been seeing quite a bit of pink and turquoise around on Christmas cards already this year, so I added the lime green and used those as inspiration for my own card.


I coloured my background piece first then added water splatters. While that dried I cut my greenery and coloured them using oxide inks, adding glossy accents and clear rock candy glitter to the berries. The sentiment was stamped using two inks and blended, then I used heat and stick powder to add glitter to that as well. You know how much I love white splatters, so they were the final touch - not meant to represent snow, just because they give that extra something, a bit of a zhuzh, lol. 


Materials used:
  • stamps - Bold Tidings Mini (Tim Holtz)
  • card - woodgrain (Tim Holtz), basic white, lemon lime twist
  • distress oxide inks - spun sugar, kitsch flamingo, picked raspberry, twisted citron, mowed lawn, salvaged patina, peacock feathers, evergreen bough, uncharted mariner
  • other - Big Shot, MISTI, craft foam, Dimensionals, blending brushes, Versmark ink, heat and stick powder, distress clear rock candy glitter, heat tool, paint brushes, white gesso, stitched frame die, Glossy Accents, Festive Gatherings thinlits (Tim Holtz)

What aspect of the image inspires you? We'd love to see your creation in our gallery and as always there's more inspiration for you over on the Just Add Ink blog.

Thanks for stopping by.

Cheers
Kerry


Tuesday, July 25, 2023

Snowfall

I wanted to make a card pairing my two favourites of the 2023-2025 in colours from Stampin' Up, boho blue and copper clay, and ended up with this card. I think the deer is on there because the die was still sitting on my craft desk from my last card, lol ... it's been put away now, I promise.


On my background piece I stencilled some star flourishes using light applications of boho blue ink over matching card. For the small feature piece I sponged boho ink over it in a sort of ombre effect from top to bottom - it's probably gotten a bit lost, but you might just notice it darker at the top. I cut two deer from copper clay, glued them together and sponged edges with matching ink. The trees were cut from watercolour card with copper clay ink for the trunks and mowed lawn oxide greenery. There's a few stars stencilled at the top of this piece too, if you look hard enough lol. Both bits were splattered very liberally with white paint plus some opaque grit paste dabbed on the ground and trees, then they were each mounted with craft foam to the next layer. I had a sentiment prepared but couldn't find a place to put it that didn't detract from the focal image so in the end just left it without - stamping on the inside would take care of that.

I love this colour combo, I think the boho blue gives it such a soft serenity. 

Materials used:
  • SU products - boho blue and copper clay card and inks
  • Tim Holtz products - Darling Deer thinlits, Hocus Pocus stencil, opaque grit paste, mowed lawn oxide ink, picket fence distress paint
  • other - tree dies, Big Shot, craft foam, Dimensionals, paintbrush, blending brushes, watercolour card

Thanks for stopping by.

Cheers
Kerry

Friday, July 14, 2023

JAI#661 - Just Add Inspiration

Welcome back to a new challenge at Just Add Ink! This week we've an inspiration pic for you that could perhaps get you in the mood for Christmas (it's closer than you think, lol).


Here's how I was inspired.


Materials used:
  • stamps - Leaf Creeper, Silhouette Grass (both Lavinia)
  • card - basic white, crumb cake, watercolour, Wonderful Christmastime junk journal (The Journal Boat)
  • Tim Holtz dies - Darling Deer, Vintage Tidings
  • other dies - Essential Arches (Spellbinders)
  • other - picket fence, frayed burlap and tarnished brass distress paints, paintbrushes, Big Shot, craft foam, sponge dauber, Holiday Talk metallic stickers (Tim Holtz), crumb cake and vintage photo inks, Dimensionals, distressing tool 

I was interested to discover the origins of the Christmas in July tradition here in Australia - apparently it's attributed to some Irish tourists who were visiting the Blue Mountains in July (which of course is summer time in Ireland but winter here) and, thrilled to see snow and reminded of Christmases 'back home',  persuaded a local hotel owner to hold a "yulefest" party. The idea caught on and here we are!

There's plenty more inspiration to see over on the Just Add Ink blog.

Thanks for stopping by.

Cheers
Kerry

Friday, July 7, 2023

Christmas in July

The colours for this week's Color Throwdown challenge intrigued me and now that we're into July, Christmas came to mind for a card.


I stamped my background with Versamark then sprinkled with embossing glaze - love their translucency, plus it gives a little shine. My arch piece was cut from teal card and I added teal ink to give it a darker shade, added the ground then splattered with white paint for the snow. My house was cut from various card and also splattered with 'snow'. Then it was a matter of adding some foliage, a sentiment sticker and pearls for berries.

Materials used:
  • stamps - Christmas background (My Favorite Things)
  • card - basic white, pool party, bubble bath, smoky slate (all Stampin' Up)
  • dies - Essential Arches (Spellbinders), Holiday Greens mini (Tim Holtz), Home for the Holidays (Concord & 9th)
  • other - Big Shot, MISTI, lost shadow embossing glaze, heat tool, pink pearls, Holiday Talk metallic stickers (Tim Holtz), picket fence distress paint, fan paintbrush, craft foam, Dimensionals

Thanks for stopping by.

Cheers
Kerry

Friday, December 16, 2022

A Christmas Twofer

Today's card is for two challenges.


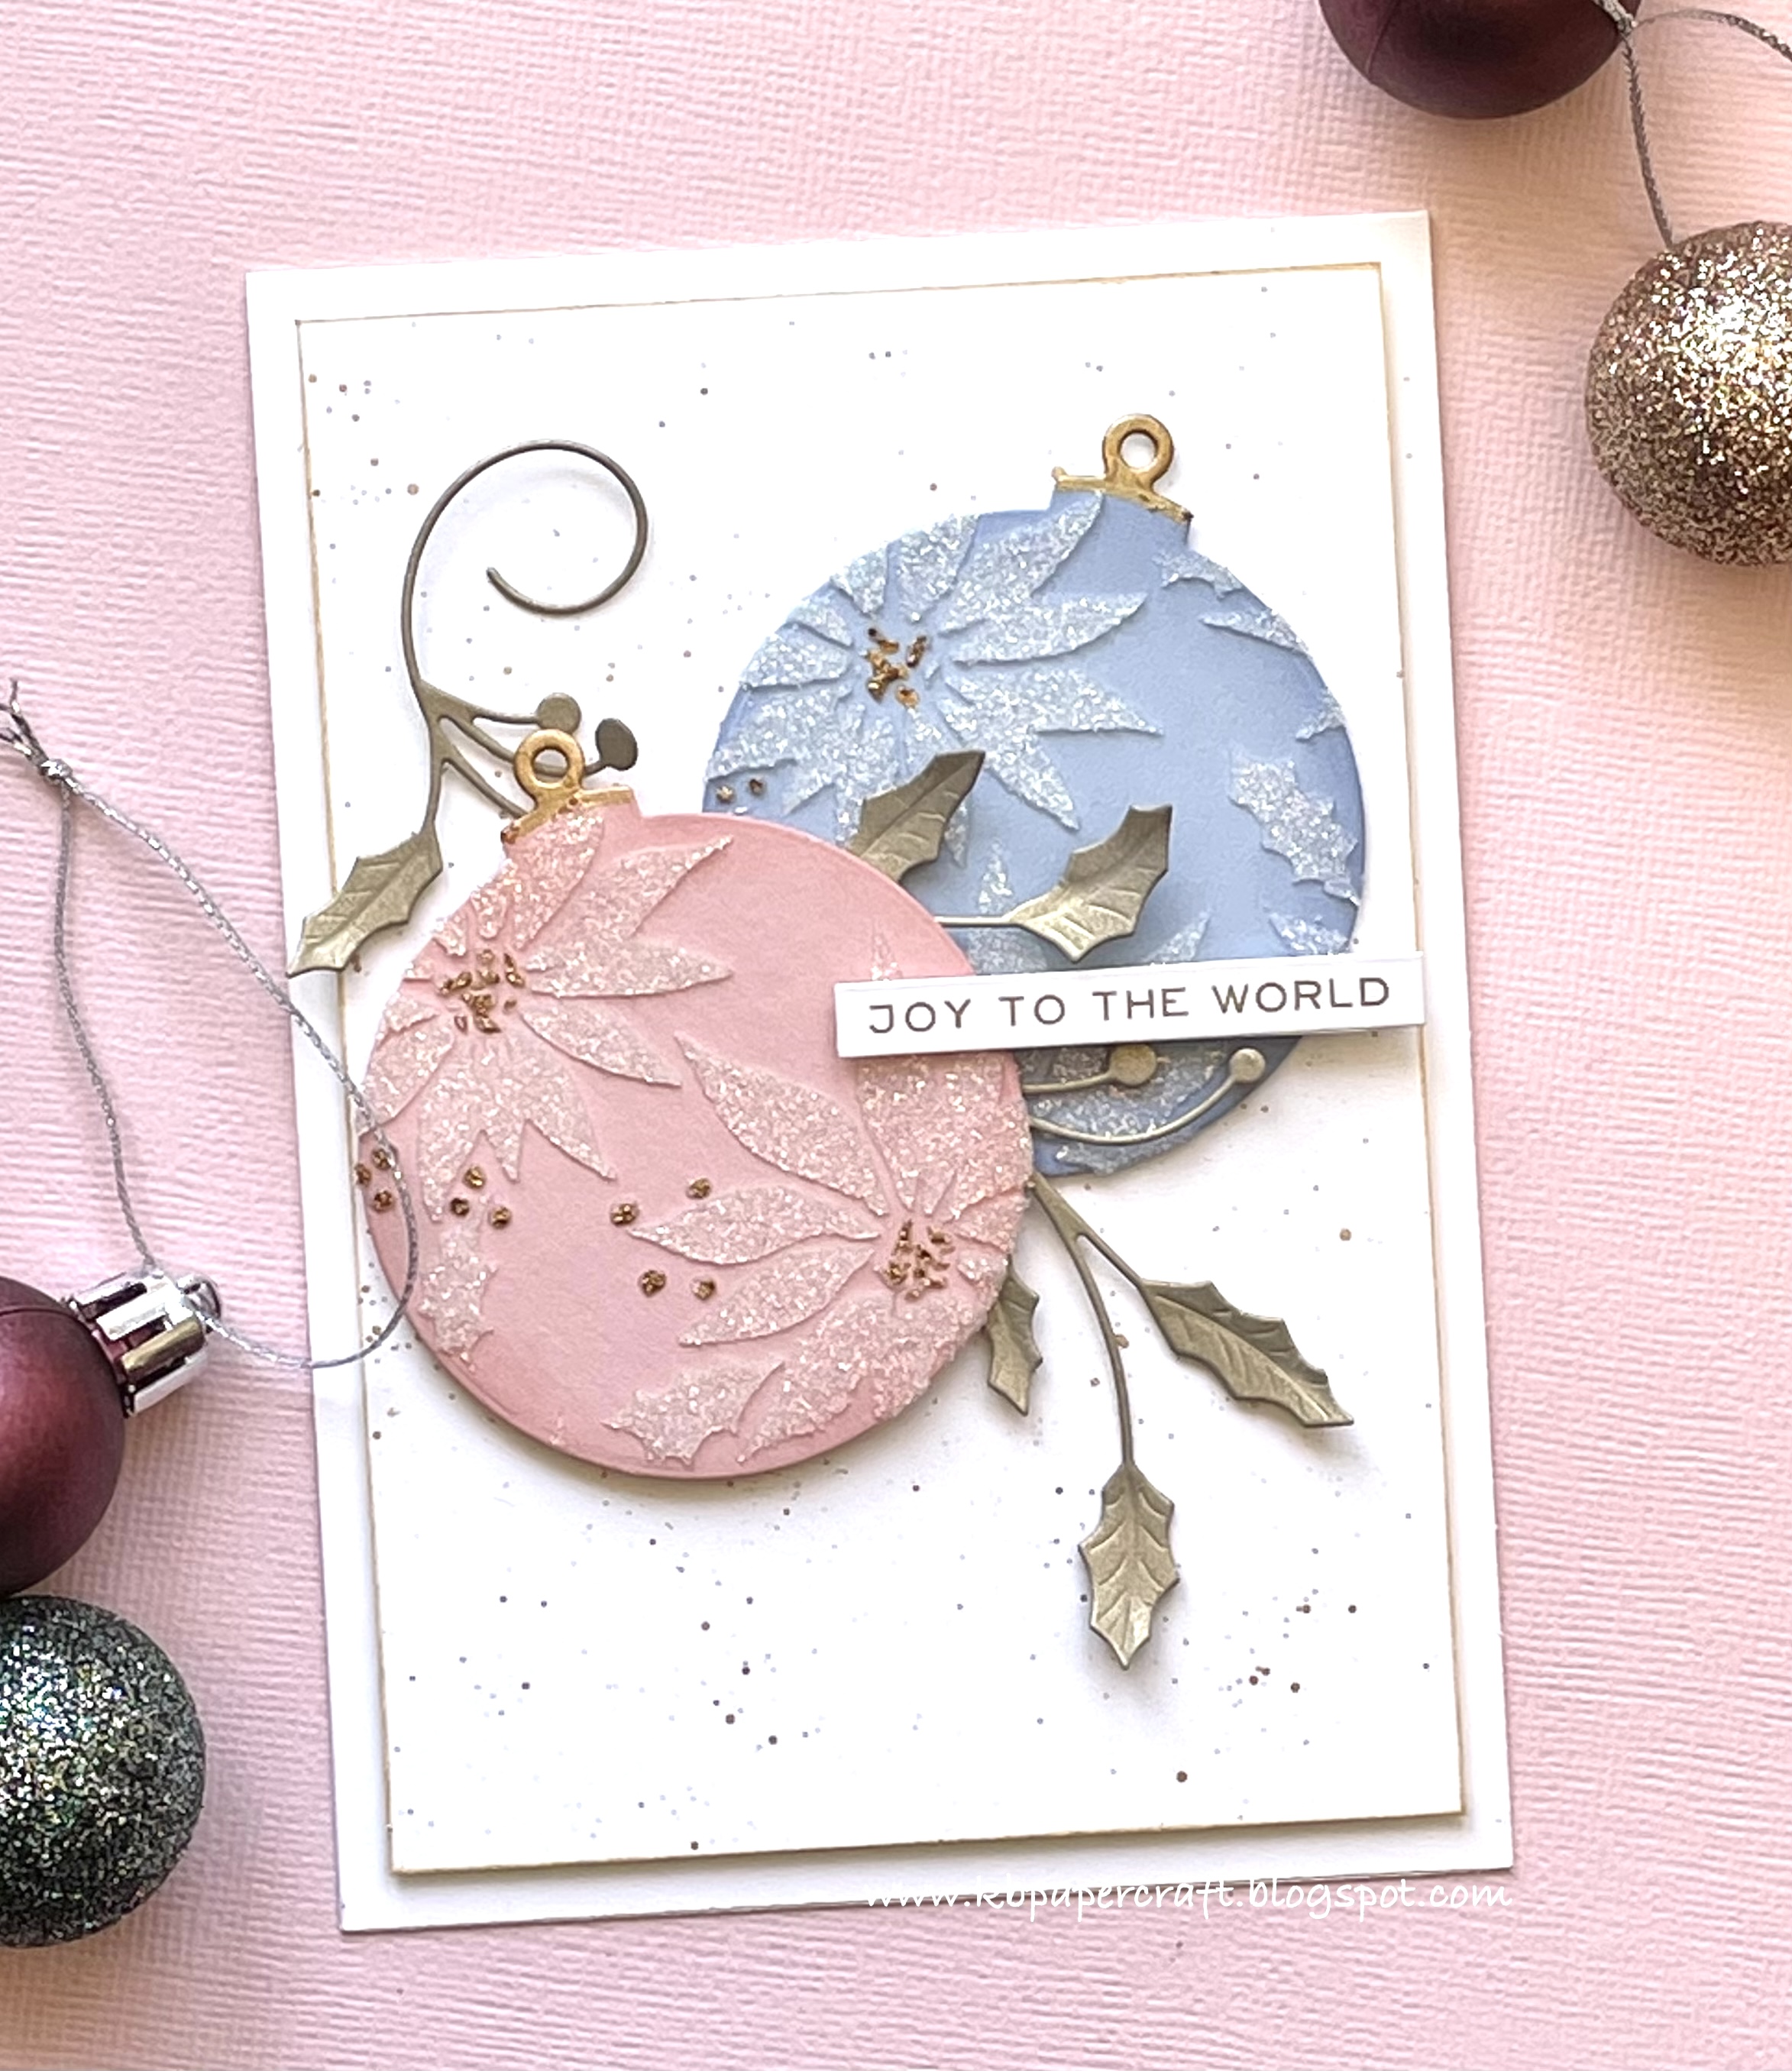
The colours in the CTD final challenge for the year are too pretty to not play with, don't you think? Then when I saw the sketch, an idea came to mind and ... well ... you know how that goes, lol. Here's my card:


I cut the baubles from coloured cardstock then stencilled with glittery texture paste, adding touches of paint once it was dry. It's rare for me to stick to a sketch so faithfully, lol, but this one was perfect for my elements. 

Materials used:
  • card - basic white, blushing bride, seaside spray, brushed gold
  • inks - blushing bride (SU), stormy sky oxide (Tim Holtz), golden glitz (Delicata)
  • other - glimmer paste (Nuvo), poinsettia stencil (TH), palette knife, tarnished brass distress paint, paintbrushes, sponge daubers, craft foam, Dimensionals, Holly flourish die (Memory Box), Holiday talk metallic stickers (TH), shaping mat and tool, Bauble nesting dies (Riverside Crafts)

Thanks for dropping in. 

Cheers
Kerry

JAI #634 - Anything But a Card

This week at Just Add Ink we are challenging you to...


I made a scrapbook layout and an explosion box, both using beautiful Christmas papers from Mintay. Here's the scrapbook page, all ready for a photo to be slotted in:


The 'merry' isn't attached at the tops of the letters so the photo can be added later. I muted the whole page with some watered-down gesso and added a layer of vellum as well, to ensure the main focal features weren't overpowered by the bright and busy background. 


And this is when I discovered how limited my photography skills are in photographing the box, lol. I hope you'll bear with me for a number of views, beginning with the closed box.


The lid features a layered poinsettia and some die cut leaves and I wrapped some luxurious velvet ribbon around the edges.


And here's some views of it opened up.


The tree is a Tim Holtz product which comes white, so it was sprayed with distress inks. As it was a tad too tall for my box I cut it shorter and inserted it into a wood slice.  I decorated it with TH baubles and gold pearls. The 'presents' are some dice I had sitting around, lol.

Materials used: 
  • card - mossy meadow, watercolour, vellum, Time of Wonders scrapbook papers (Mintay)
  • Tim Holtz products - woodland tree, distress spray stains, baubles, wood slice, velvet trim, mini holiday greens die, aged mahogany distress paint
  • other - glue gun, gold cord, cherry cobbler thick bakers twine, gold pearls, dice, gift wrap, chipboard saying (Mintay), white gesso, sponge daubers, paintbrush, ivory pearls

Check out the amazing items my team mates created for this challenge and of course we'd love to see your creations in our gallery.

Thanks for calling in.

Cheers
Kerry

Sunday, December 11, 2022

Christmas Gift Cards

The current Color Throwdown challenge has some very Christmassy colours.


I decided to make a series of gift cards and store them in this gorgeous mini tartan tin.


I had three tartan papers so made four cards with each (but the tin will fit more), adding two or three items of Christmas ephemera. Each one has a gold cord tie and splatters of gold paint. They measure 2 1/4" x 2 1/2" closed.


Lots of fun to make and so useful for when I get around to wrapping gifts!

Materials used:
  • card - basic black (SU), Christmas backdrops (Tim Holtz)
  • ephemera - Christmas botanicals, Christmas ephemera (both Tim Holtz)
  • other Tim Holtz products - festive tin, tarnished brass distress paint, black soot oxide ink, splat box, Christmas design tape
  • other - crop-o-dile, gold cord, gold pearls, vintage gold wax (Finnabair), sponge dauber, paintbrush

Thanks for calling in.

Cheers
Kerry