Last week's Christmas class focused on gift boxes and tags and I was busy for days beforehand creating samples to inspire my ladies. Here are the boxes we made in class:
This star box is a template from Lauren Meader and is very simple to put together. I decorated by stamping in crumb cake ink using Bells and Boughs and added a tulle bow and poinsettia with pearls.
Our next treat was a hexagon box made from the mini milk carton die - you've seen plenty of these before. As I used some "bauble" papers (Snow Festival dsp), I added a bauble shaped tag to match.
And lastly a simple fancy favour box, stamped with snowflakes and decorated with tulle, chunky glitter, snowflake (snow flurry die) and sentiment from More Merry Messages.
Other boxes I had for display:
Fancy Favour box again, doubled this time, plus a box made from four scallop envelopes.
SU's kraft gift boxes. The gingerbread paper is non SU but so adorable I couldn't resist!
Some simple candy wrappers.
A petal cone hanging decoration plus elongated candy wrapper.
I had also prepared a smattering of tags to give my ladies some ideas and then I gave them free run with dies, papers, ribbon, stamps, punches and more! It was bedlam there for a while, lol!!!
It has been fun doing Christmas things - homemade items always add that extra special personal touch!
Thanks for calling in.
Cheers
Kez
Showing posts with label mini milk carton. Show all posts
Showing posts with label mini milk carton. Show all posts
Friday, November 23, 2012
Wednesday, October 31, 2012
Boo!
Happy Halloween all of you out there in cyberspaceland who may celebrate this particular day! It's a bit of fun in an otherwise hectic week and although I made today's projects some weeks ago, I've been saving them to share with you today.
This card uses SU's Spooky Bingo Bits set and the hilariously named Howlstooth and Scaringbone papers!
For this altered milk carton box I used cajun craze card and last year's Frightful Sight papers, together with a cute jumbo wheel I borrowed.
The Fancy Favor box is the base for this one, with the crinkly top cut off. The haunted house die cut was a present from a friend and SU's Wicked Cool stamp set was used for the "spooky" sentiment.
So I've bought some lollies and am just waiting to see if we get any Trick or Treaters - we had none last year, so I may be forced to eat the lollies myself - such a shame!
Thanks for popping in.
Cheers
Kez
This card uses SU's Spooky Bingo Bits set and the hilariously named Howlstooth and Scaringbone papers!
For this altered milk carton box I used cajun craze card and last year's Frightful Sight papers, together with a cute jumbo wheel I borrowed.
So I've bought some lollies and am just waiting to see if we get any Trick or Treaters - we had none last year, so I may be forced to eat the lollies myself - such a shame!
Thanks for popping in.
Cheers
Kez
Sunday, June 26, 2011
Petite Chic
Sorry to be MIA for so long - had to make a quick road trip down to Melbourne to rescue my two DDs stuck because of the ash cloud!
Anywho, we're making hexagon boxes in class this week using the mini milk carton die (as per my tutorial here) so I thought I'd do my own version of Rob's Artistic Etchings one from Unconvention (see it here).
As I love the look of black and cream I've used those, with a touch of grey and yellow thrown in. Here's how it turned out:
Oo-la-la! DD19 loves it, so hope my ladies will too.
Thanks for calling in.
Cheers
Kez
Wednesday, June 15, 2011
Asian Inspired and My First Tutorial
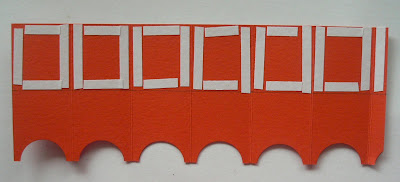
Howdy! I have had a few requests for a "how to" on the mini milk carton box with the legs, so settle down for a long post and here goes!
- cut two mini milk cartons using your die and Big Shot
- cut off one complete section from each as shown below
- the centre panel has different scoring to the others (to make the spout part) but we need it to be the same, so firstly score from where the point meets the top, down to the next score line as seen below
- now score from here to either corner so you have a triangular scored shape like the others
- fold all your score lines and use your bone folder to get nice sharp creases
- using strong adhesive on the end tabs, attach the two boxes together
- to help keep your hexagon the right shape, join the bottom pieces as follows: take two opposite pieces and join them so they match perfectly and make a straight line
- now cut another piece of cardstock 25.6 cm wide and height whatever you want - I used 9.5 cm for this sample
- score this piece every 4.1 cm, so at 4.1, 8.2, 12.3, 16.4, 20.5 and 24.6 - you will then have a 1 cm piece for joining
- using the 32 mm (1 1/4 inch) circle punch, punch the bottom of each section as shown below. I punched a piece of scrap paper first, folded it in half, then drew around it to give me a guide to where to punch my first one (see below), then traced around the one I had punched as a guide for the others
- don't forget to give the end piece a bit of shape too
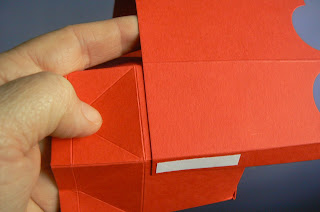
- now decide how high up the carton you want to attach your "legs" piece. Don't put it right up to the fold as this will show too much - put it a bit below so you can hide it with your decorative panels of DSP or whatever
- put plenty of strong adhesive on the inside part - remember not to put the adhesive so far down that it goes beyond the base of your box (I drew a line at 4.5 cm so I would know where to stop!)
- use your crop-o-dile to punch holes in the folded top sections, then thread ribbon through to tie
Phew! I hope I haven't forgotten anything - have proofread this a million times!
Hope you have tons of fun making your own boxes. Many thanks to my mate Robbity for showing me how to make them in the first place!
Cheers
Kez
Edited to Add: I have since discovered that my friend got the idea for this box from two projects posted on www.creativityinprogress.com Many apologies to Sunghee for not giving her credit originally.
Cheers
Kez
Edited to Add: I have since discovered that my friend got the idea for this box from two projects posted on www.creativityinprogress.com Many apologies to Sunghee for not giving her credit originally.
Tuesday, June 14, 2011
Gift Boxes
I've had fun making more hexagon boxes from the mini milk carton die - just love these, they are so easy and so effective.
For the first one I wanted to go all girly and floral for some reason! I used two sets that I got from overseas and am hoping they make it into our new catalogue - Baby Blossoms and Four Frames. My colours are certainly celery, wild wasabi, pretty in pink and regal rose.
My second has the added "legs" and a much bolder colour combination with my favourite "kerry cobbler", marina mist and a touch of gold. These papers are called Paisley Petals - another "foreigner" I am hoping will appear on our shores come September.
Think we might just have to have a class on these soon!
Thanks for dropping by.
Cheers
Kez
Subscribe to:
Posts (Atom)


