Showing posts with label stampin up. Show all posts

Thursday, February 8, 2018

Classy Gents

Today I really enjoyed making up some masculine cards for my stash, using one of my all-time favourite elegant colour combos of vanilla and black. SU's Truly Tailored stamp set dovetails perfectly with older SU punches and dies, plus some other dies I bought on eBay.


Materials used:

  • stamps - Truly Tailored
  • card - basic black, very vanilla
  • other - masculine dies (brand unknown), tailored tag punch, moustache die, bow builder punch, large black rhinestones (non SU)

The one with the bow tie makes me think how sumptuous men look in a tux - am I right, ladies?


Thanks for calling in.

Cheers
Kez

Wednesday, July 31, 2013

Putting On The Hex

I've been having a play with the hexagon punch, kindly loaned to me by my mate Rob. My two cards are the same design but the colours and embellishments create a whole different look.

Firstly a card for DD21, who returned to uni in Melbourne last week after a visit that was way too short for her mama! She loves polka dots.


Materials used:
  • stamps - Really Good Greetings (MDS)
  • card - basic black, very vanilla, raspberry ripple, Modern Medley dsp
  • other - hexagon punch, dimensionals, scallop ribbon border punch, owl punch

And DD always, always looks inside my cards to see if I've decorated in there too, so of course I had to for her card!


And my second card has a touch of Spring with some bright florals and ginghams.


Materials used:
  • stamps - Really Good Greetings (MDS)
  • card - island indigo, whisper white, daffodil delight, melon mambo, Gingham Garden dsp (MDS)
  • other - hexagon punch, dimensionals, itty bitty punch, rhinestones, embossing stylus, shaping mat (non SU)

Now that I have had a play with it, I think this punch will get bumped up higher on my wish list!

Thanks for stopping by.

Cheers
Kez

Wednesday, December 5, 2012

Last Class

Well, it had to happen some time - the last class of the year. Here are the cards we made, firstly a simple masculine card:


Materials used:
  • stamps - Best Dad Ever
  • card - gumball green, midnight muse, whisper white, gumball green patterned paper
  • other - rhinestone, buttons die, white gel pen, dimensionals, white bakers twine

Then I had to give my new Hello Doily stamp an airing - this has been on my wish list for a LONG time! I paired it with the beautiful Field Flowers and a sentiment from Blooming with Kindness:


Materials used:
  • stamps - Hello Doily, Field Flowers, Blooming with Kindness
  • card - crumb cake, rich razzleberry, very vanilla
  • other - crumb cake seam binding, dimensionals, stamp-a-ma-jig

And of course I could not complete the year without some kerry cobbler, now could I? This one was inspired by a Melissa Davies card and I've used another new set, Everything Eleanor. Bit of fussy cutting with this one, but my ladies cheerfully fiddled with it!


Materials used:
  • stamps - Everything Eleanor, Blooming with Kindness
  • card - cherry cobbler, very vanilla
  • other - apothecary accents die, pearls, cherry cobbler seam binding, large scallop edgelit, delicate designs embossing folder, stripes embossing folder, sponge dauber, dimensionals

It has been another wonderful year of classes with my lovely ladies and while I am looking forward to a break, I know I'll be raring to get back to it come January!

On Monday night we had our Christmas get together dinner and here is the Christmas card I made for everyone (cased from Steffi):


Plus there was a small gift in a lovely Fancy Favour gift box, which were made in different colour combinations:


Hope you're having fun at your Xmas "doos" too! Thanks for stopping by.

Cheers
Kez


Friday, July 29, 2011

I Know You Don't Want To Hear This, But ...

...... Christmas is coming!

Oh, yeah, you know it - once we hit July, it's a downhill run from there! LOL! And as papercrafters we know what that means ... start your Christmas cards!

This month we started our Christmas stamp-a-stack classes and here are the two cards we made:


I loved using non-traditional colours for this case from my upline Marelle.

Materials used:

  • stamps - Dasher, Four the Holidays
  • card - crumb cake, whisper white, perfect plum, concord crush
  • other - Petals A Plenty embossing folder, scallop trim border punch, white taffeta ribbon, white gel pen, dimensionals


A simple design for this one so there was time to do the colouring in. Love this cute little image!

Materials used:

  • stamps - Greeting Card Kids
  • card - cherry cobbler, very vanilla, watercolour
  • other - Kaiser designer paper, nestabilities die, dimensionals

And not for class but just for my own collection, I also played around with the ever popular Lovely as a Tree for this card:


Materials used:

  • stamps - Lovely as a Tree, Four the Holidays
  • card - always artichoke, creamy caramel, very vanilla
  • other - Kaiser designer paper, nestabilities die, dimensionals, square punch

It's almost time for August's class, so I'll be back soon with more Christmas cards. You better get started on yours!

Thanks for dropping by.

Cheers
Kez

Friday, July 8, 2011

Brayering 101

My Sunday ladies - feeling proud of their recent upgrade from beginner to intermediate, LOL - are giving brayering a try this week, so I've made some cards with simple brayering to start them off.

Firstly a floral vision in pinks with some watercolouring thrown in for extra fun. I cased a card I made at stamp camp a couple of years back. Looks more gorgeous IRL, the subtle pinks don't show well in my photo.


Materials used:
  • stamps - Best Yet, Fabulous Florets
  • card - pink pirouette, whisper white, chocolate chip, watercolour paper
  • inks - pink pirouette, blushing bride, chocolate chip
  • other - stamp-a-ma-jig, dimensionals, blushing bride marker, brayer

Next a masculine card and I've given the sailboat a rest this time in favour of the Motorcycle a la carte stamp. Two of my ladies' husbands are big into bikes, so they will love this one. I have cased a card by Kristine McNickle as I just love her colour combination and simple design.


Materials used:
  • stamps - Motorcycle, Best Yet
  • card - whisper white, river rock, basic black
  • inks - peach parfait, river rock, always artichoke, basic black, black StazOn
  • other - dimensionals, 35 mm punch, 38 mm punch (non SU), brayer, Versamark pen, clear embossing powder, heat gun

And lastly a card using my go-to set when I want a stunning card using almost any technique - Inspired by Nature. This one was cased from Laurie F.


Materials used:
  • stamps - Inspired by Nature
  • card - very vanilla, basic black, more mustard
  • inks - so saffron, more mustard, cajun craze
  • other - dimensionals, stamp-a-ma-jig, brayer, sponge dauber

If you fancy an intro class in brayering at your place, why not email me here - sorry, won't go outside state borders (unless of course, you pay the airfare!) LOL!

Thanks for stopping by.

Cheers
Kez

Sunday, June 26, 2011

Pencil Magic

(second post today - scroll down for earlier post)

Last week my Sunday ladies learned the Black Magic technique - so simple and so effective.

Here are the cards they made:


This one was inspired by a card by Deb Valder and I've used "kerry cobbler", basic black and white with the Just Believe stamp set. In the background are En Francais (LOVE this stamp) with a non-SU harlequin design.

Next up I dragged out retired set Live Like You Mean It and used a gorgeous nestabilities shape for highlighting my main panel. The spotted background paper is from Love Letters and I just sponged some purple on to match my flowers. I shaped my "banner" sentiment with my bone folder to get it to sit how I wanted it.


Last but not least, I don't think you can do this technique without using either Upsy Daisy or Inspired by Nature - both sets were just "made" for this style! I chose IBN and here's how it ended up:


Thanks for stopping by.

Cheers
Kez

Petite Chic

Sorry to be MIA for so long - had to make a quick road trip down to Melbourne to rescue my two DDs stuck because of the ash cloud!

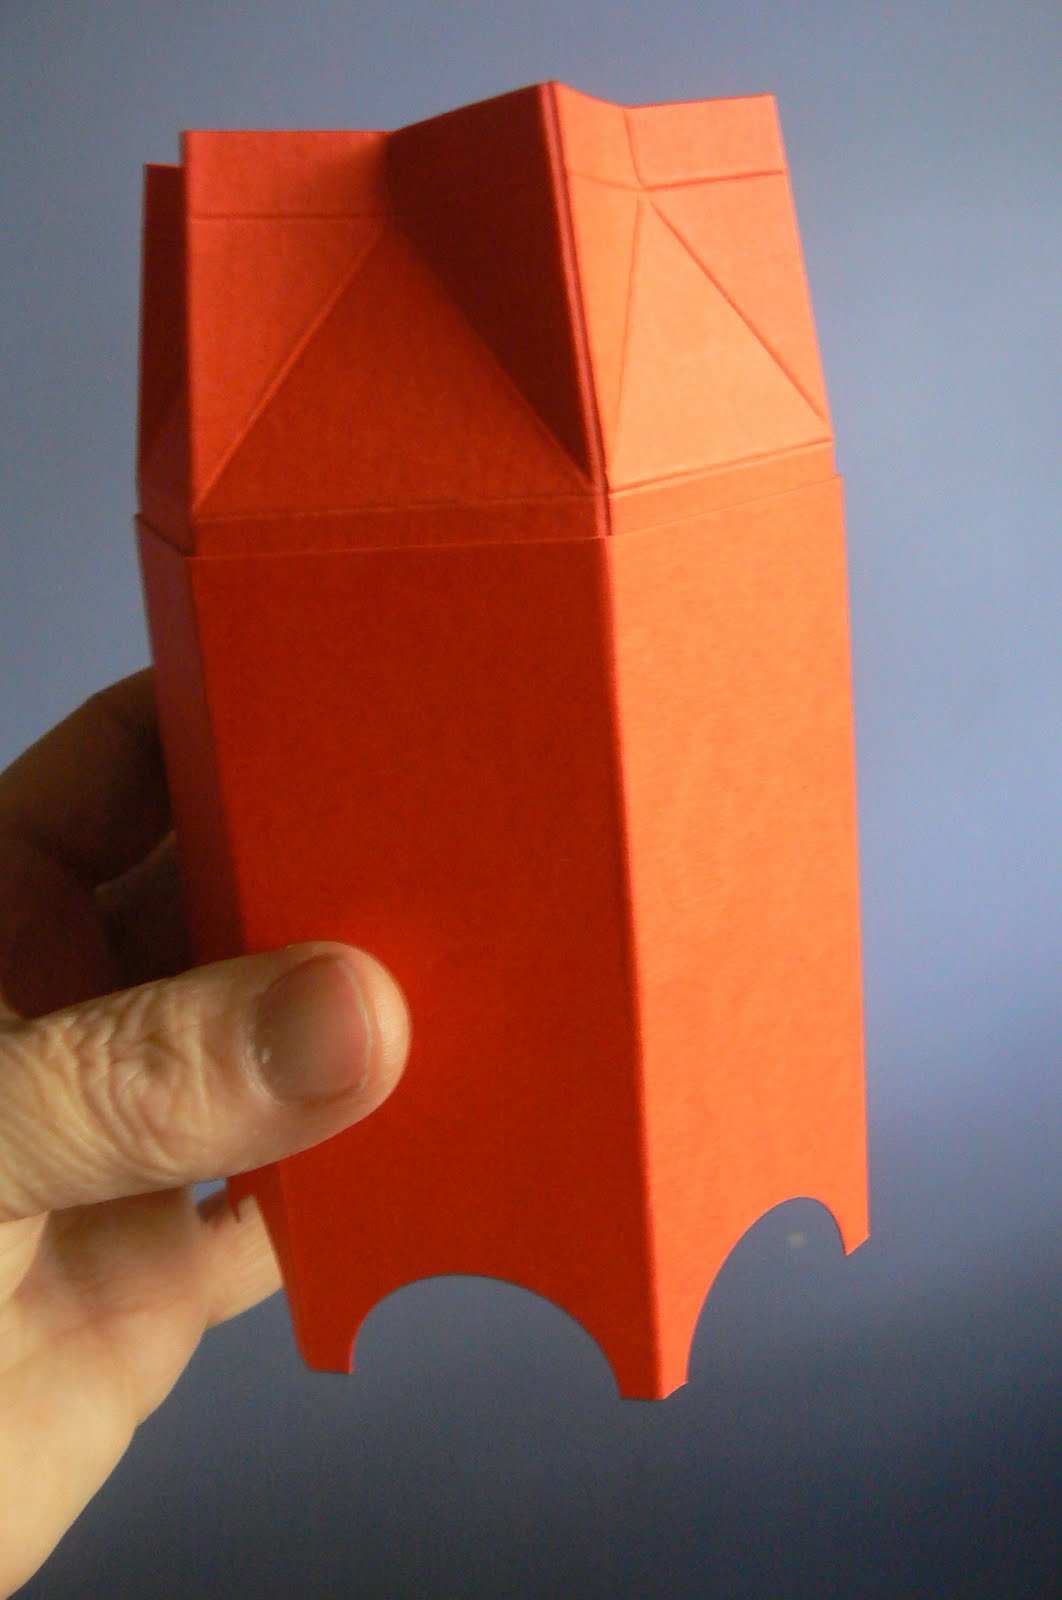
Anywho, we're making hexagon boxes in class this week using the mini milk carton die (as per my tutorial here) so I thought I'd do my own version of Rob's Artistic Etchings one from Unconvention (see it here).

As I love the look of black and cream I've used those, with a touch of grey and yellow thrown in. Here's how it turned out:


Oo-la-la! DD19 loves it, so hope my ladies will too.

Thanks for calling in.

Cheers
Kez

Saturday, June 18, 2011

Playing With My Brayer

Had an urge to dust off my brayer, so I pulled out the fabulous Sail Away again - so great for male cards - and brayered a moon rising on the horizon using marina mist and night of navy for the sea and more mustard, cajun craze and kerry cobbler for the sky.


The stamped background on the mustard is Old World Map, a retired SU stamp borrowed from the lovely Lynda, and the DSP is Nautical Expedition (not released in Aus but PLEASE put it in our new catty! with the matching stamp set, preferably!!!).

Now, I think I can count on the fingers of one hand the number of times I have used the in colour Poppy Parade. It's not really my cup of tea - it's no kerry cobbler, let's face it! - but I made a concerted effort to give it an airing with this card.


I brayered with daffodil delight, peach parfait and poppy parade and I think they have blended really well together. The bird from Every Moment was stamped in black StazOn ink and then coloured in with basic black marker, then I stamped the grass from Inspired by Nature (hope they never retire this set) using my stamp-a-ma-jig to place it just so. Some embossing with the square lattice and there's my card.

Thanks for all your kind words on my first tutorial and I hope you'll stop by again soon.

Cheers
Kez

Wednesday, June 15, 2011

Asian Inspired and My First Tutorial


Howdy! I have had a few requests for a "how to" on the mini milk carton box with the legs, so settle down for a long post and here goes!
  • cut two mini milk cartons using your die and Big Shot
  • cut off one complete section from each as shown below
  • the centre panel has different scoring to the others (to make the spout part) but we need it to be the same, so firstly score from where the point meets the top, down to the next score line as seen below

  • now score from here to either corner so you have a triangular scored shape like the others
  • fold all your score lines and use your bone folder to get nice sharp creases
  • using strong adhesive on the end tabs, attach the two boxes together

  • to help keep your hexagon the right shape, join the bottom pieces as follows: take two opposite pieces and join them so they match perfectly and make a straight line

  •  do this with the other two sets of opposite pieces as well
  • now cut another piece of cardstock 25.6 cm wide and height whatever you want - I used 9.5 cm for this sample
  • score this piece every 4.1 cm, so at 4.1, 8.2, 12.3, 16.4, 20.5 and 24.6 - you will then have a 1 cm piece for joining
  • using the 32 mm (1 1/4 inch) circle punch, punch the bottom of each section as shown below. I punched a piece of scrap paper first, folded it in half, then drew around it to give me a guide to where to punch my first one (see below), then traced around the one I had punched as a guide for the others


  • don't forget to give the end piece a bit of shape too
  • now decide how high up the carton you want to attach your "legs" piece. Don't put it right up to the fold as this will show too much - put it a bit below so you can hide it with your decorative panels of DSP or whatever
  • put plenty of strong adhesive on the inside part - remember not to put the adhesive so far down that it goes beyond the base of your box (I drew a line at 4.5 cm so I would know where to stop!)

  •  begin attaching at the tab part and move around the box, adhering firmly


  • use your crop-o-dile to punch holes in the folded top sections, then thread ribbon through to tie

  • now decorate the side panels as you like - either one piece of DSP all the way around, or separate panels as per the examples below


Phew! I hope I haven't forgotten anything - have proofread this a million times! 

Hope you have tons of fun making your own boxes. Many thanks to my mate Robbity for showing me how to make them in the first place!

Cheers
Kez

Edited to Add: I have since discovered that my friend got the idea for this box from two projects posted on www.creativityinprogress.com Many apologies to Sunghee for not giving her credit originally.

Tuesday, June 14, 2011

Gift Boxes

I've had fun making more hexagon boxes from the mini milk carton die - just love these, they are so easy and so effective.

For the first one I wanted to go all girly and floral for some reason! I used two sets that I got from overseas and am hoping they make it into our new catalogue - Baby Blossoms and Four Frames. My colours are certainly celery, wild wasabi, pretty in pink and regal rose.


My second has the added "legs" and a much bolder colour combination with my favourite "kerry cobbler", marina mist and a touch of gold. These papers are called Paisley Petals - another "foreigner" I am hoping will appear on our shores come September.


Think we might just have to have a class on these soon!

Thanks for dropping by.

Cheers
Kez

Monday, June 13, 2011

Punch Buggy Yellow

Do your kids/grandkids love to play the Yellow Car and Punch Buggie games? My girls do and we often have a hilarious journey trying to beat each other to find both and call "punch buggy yellow"! Being in the driver's seat has its advantages and disadvantages, mind you! But we can't play Yellow car when we are in Melbourne with DD19 as she lives very close to the CBD and all the taxis are yellow! LOL

So having seen a gorgeous punch art VW beetle some time ago, I finally got around to making a punch buggy yellow card - literally! Here tis:


I love it! Takes me back aeons ago to my own childhood when we had a white VW beetle - named Herbie of course! (For those of you ancient enough to remember the original Love Bug movies!)

Thanks for dropping in.

Cheers
Kez

Edited to add Punches used:

  • Wide oval - hood & car top
  • Large oval - windshield, hood & side fenders
  • Word Window - bumper
  • Modern Label - tires
  • 1/2" circle - black headlights
  • new punch pack 3/8" circle - gray headlights
  • Horizontal slot punch - rear view mirror, bumper add-ons & hood handle


Saturday, March 26, 2011

What's Enough Coffee?

This is my second post today and my second entry for the Just Add Ink challenge - just add stamps. Only stamps and cardstock allowed - no embellishments of any kind!

Regular visitors will know that I don't drink tea or coffee, but I do love making cards about them! Especially for my girls, who are both totally addicted.

I found this great quote and was dying to make a card with it. I've used my Take A Sip wheel together with the new Sew Suite set from the upcoming Autumn/Winter mini. My sentiment had to be computer generated - I hope that's allowed in the challenge! Here tis:


He he! That quote cracks me up! In my case it would be 'you haven't eaten enough chocolate until you can thread a sewing machine while it's running', LOL! Hmmmm, maybe there's another card there ...!

Thanks for stopping by.

Cheers
Kez